TVC: François Bellefeuille

Last month I got a call from PMT to grade a TVC for François Bellefeuille, a Quebec humorist. The 30 sec edit shows a popular comedian subbing for Bellefeuille who didn’t want to perform his show that night.
The first was treated lightly to keep the feel of the onstage look with bright blue lights. The last shot that shows Bellefeuille has more contrats and saturation to it. It looks darker on this YouTube video but the skintone was pretty rich.
And the cool grading room at PMT:
Export SpeedGrade looks for DaVinci Resolve
In this second article on look exchange we’ll try to migrate a look created in SpeedGrade CC to DaVinci Resolve 10.
SpeedGrade works extremely well with other software and grading solutions. Iridas used to develop a version called SpeedGrade Onset whose purpose was to create looks on set and eventually move them to the grading station or to the lab for daillies. SpeedGrade then inherited of this great ability to export various kind or flavors of LUT for a wide range of color grading workstations.
Creating the grade
First, we have to open a SpeedGrade project and create a look. For this look we will only use one stack containing three look layers.
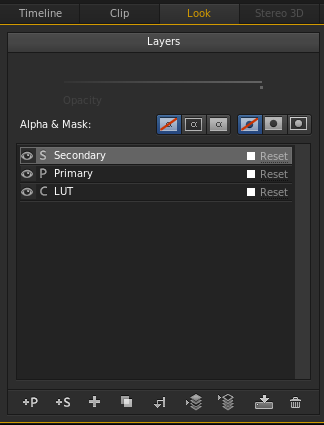
Layer 1: A LUT called BLUE ICE created by LookLabs
Layer 2: A Primary to give a bit more crunch in the highlights
Layer 3: A Secondary to remove most of the green in the trees
Copy grades from Resolve to SpeedGrade
I’ve been working as a Resolve colorist for the past couple of years but last summer I was asked to sub for a veteran SpeedGrade colorist on a drama to be broadcasted on Radio-Canada. I did the first two shows on Resolve and finished the remaining shows on SpeedGrade. I was amazed at the speed and responsiveness of the Adobe app.
I then began to jump from one system to the other depending on the project and the DP. I find Resolve to be a much more effective tool for creative work with a DP who wants to try very precise variations at the beginning of a project. On the other hand, SpeedGrade is much faster to help you grade through long episodes, apply vignetttes and do modifications on whole scenes during approbation sessions.
As I was changing software so often, I needed to find a way to move grades, tools and looks across platforms and I found out I’m not the only one doing this. This is why I’m writing these articles on looks exchange between apps. The first one is about building a grade in Resolve and moving it to SpeedGrade to use it in another project.
Creating the grade
So, let’s see how to build a complex look in Resolve and export it for SpeedGrade. To do this, we will use the deep Lookup table (LUT) integration in SpeedGrade. SpeedGrade can import, use and even convert various kinds of LUT. Lookup Tables can recreate about any color modification applied to a digital image: saturation, luma, hue. It acts as a reference table between two color setups. It takes the RGB value of the source and gives it the equivalent values in the referenced setup, doing so, it changes the color and applies the look. LUTs are very powerful. The only grading tool it cannot support is the power window. LUT can make no reference to a position, it’s only applying a color modification to predetermined color. Therefore LUTs cannot be used for vignettes, masks or grads.
Here, I’ve a look in Resolve 10 using 4 nodes:

Warm grade created with Resolve nodes
Node 1: I applied the standard Arri Log C to Rec 709 LUT
Node 2: I shanged the color of the big yellow shoe to orange with the Hue vs Hue curve
Node 3: I warmed up the scene with the Primaries
Node 4: I changed the color of the bag from blue to purple with the Qualifier and a Hue shift
Formation Resolve pour DoP
Comme j’avais beaucoup de demandes de mes copains DoP j’ai décidé de proposer une formation DaVinci Resolve 10 de 8 heures.
Cette formation a pour but d’initier les directeurs photo au logiciel d’étalonnage DaVinci Resolve 10. À l’aide de présentations et d’exercices sur postes individuels, cette journée de formation permettra aux participants d’utiliser les outils de correction de couleur, d’analyse d’image pour optimiser les rendus des images tournées.
Cette formation s’adresse aux directeurs photo et aux opérateurs de caméras Blackmagic Design voulant tirer le plein potentiel des images RAW, log ou vidéo tournées avec leur caméra.
La formation aura lieu le à la fin janvier à l’INIS. Pour plus d’info inscrivez-vous au mailing list en suivant ce lien: http://ilovehue.net/?page_id=103
Ouisurf web series III
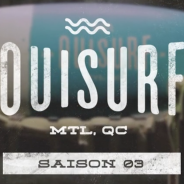
I got asked by the guys at Ouisurf.ca to graded the teaser and following episodes of their third web series. This is good ol’ surfing brought to you in the form of beatifully shot images captures by 5D mkIII and GoPros.
It was graded in Resolve following the guidelines I had for the tv series. The episodes were given a more aggressive look using gradients, heavily tinted shadows and highlights.
To watch the episodes you may follow this link: www.ouisurf.ca
Optimizing playback in Resolve 10
DaVinci Resolve is now used in various ways: for movies, web tv, broadcast and now, live grading. The lite version, that is actually free, spread its adoption even further. Most of the broadcast gigs I work on are graded on the Lite version. Sometimes on dedicated workstations but also on Macbook Pro and iMac.
These smaller setups often have their limits. Working on those, you’re always on the edge of loosing your realtime playback, you can’t approve a show without the sound stuttering and the final export takes forever to write on disk.
Fortunately, in Resolve 10, Blackmagic Design gave us a lot of ways to optimize playback when we have to work on shots in realtime and other ways to assure we have the full quality on exports. Here are a few tricks that can help you getting a better performances in DaVinci Resolve 10.
Optimize you GPU usage
So, first, if you have a nice multi-GPU setup with a display card and another one dedicated to processing you might want to check this new preference setting. When you go to Preferences/Video i/O and GPU, there is a new box called “Use display GPU for compute”. Since most GPU card you can buy are now pack more power than needed to run the resolve interface, you can now use the remaining cycles to help process the grades and effects. Of course, you’ll have to quit and relaunch the app for Resolve to consider this change.
Video playback
Video playback can also generate some lag. If you need more power but don’t really need you broadcast monitor, like when monitoring an animated PowerWindow for tracking, you can disable it. In the same panel as the GPU setting, at the “For Capture and Playback use”, choose NONE, save and relaunch the app.
Settings
Most of the tweaks happen in the Project setting panel. Some settings will make it easier for you to maintain your realtime while working.
In the Master project settings panel of the Project Settings window, you’ll find the “Enable video field processing” checkbox. It’s used when working with interlaced media. When checked, Resolve takes a lot more time to process each frames as it applies the grade on each individual field separately. You can keep this unchecked to go through your grading session. You can ad it back in the Export setting where you’ll find the same checkbox. This is very important, especially if you did some resize on interlaced clips. It could result wavy edges and interlace problems if left unchecked.
In the Video Monitoring section of this panel, you’ll find a lot of settings that will give you more horsepower. The first one is “Video bit depth”. You have the choice between 10bit or 8 bit. 8bit is less processor intensive than 10bit but it may result in banding. You can always revert back if you have a doubt about the final rendering of a gradient.
Just under it, you’ll find the “Hide UI overlays for optimized playback”. This does exactly what it says. It will hide your cursor, PowerWindows borders and split screens during playback. This setting has no effect on export quality so you can leave it checked throughout the grading and export process.
In Resolve 10, all the viewer are sent to the broadcast monitor output by default. If you don’t want that, you’ll have to turn off the “Show all viewers on video output”. This could help when viewing shot in the MEDIA, EDIT or DELIVER pages.
In the Image Scaling panel you get some performance oriented option too. The Resize filter section gives you an “Optimize for playback” option that does just that. You can come and change it back before exporting or use the “Force sizing to the maximum quality” in the Render settings of the DELIVER page.
Also in the Image Scaling panel, you’ll find some settings very usefull if you are using RAW footage. The Debayer quality setting give you the Optimize for playback option. When checked, Resolve will use a smoother and faster debayer on playback and a sharper one when on pause. You can use the “Force debayer res to higher quality” option in the Render Settings to override the Debayer Quality setting for your final export.
In the Editing panel of the Project Setting window, you get important option to improve the realtime performances of your Resolve workstation. In the Frame interpolation section, you have a Retime process drop down menu. Between the two options, Nearest is the fastest and Optical Flow will usually give the best results while being very processor intensive. You can set it to Nearest while grading and come back and the end to set it back to Optical Flow. You can also change this setting on a clip to clip basis in the Inspector tab of the EDIT window.
Just under this option, you’ll find a faster/better choice for the Motion estimation mode related to the processing of the retime process on Optical Flow. These two are pretty much self-explanatory.
The next option, the Motion range also affects the performances. The bigger the range, the more processor intensive it gets.
In the General Options panel, you find the “Don’t update interface icons during playback” options that is a lot like the Hide UI overlays for optimized playback and might same you a few GPU cycles.
RAW
Most RAW formats will support debayering at lower resolution or quality than the resolution were shot at. If you go to the Camera Raw panel of the Project settings you’ll see that RED, Cinema DNG and Sony Raw and ARRI Raw all have a Decode Quality setting. This give you the choice of only decoding half or the quarter of the original image information to gain speed. This also affects resolution but it is very useful to lower the decode quality if you are rendering daillies or just scanning through shots.
However, if your systems really has problem playing back 4K raw material you can do a flat pass to ProRes or another lighter codec once you have adjusted your raw settings for each shots and work from these new files.
Close the scopes
The scope window can also eat some precious frames. If you are on a slower workstation, close them when you have to playback the timeline os use some external scopes like Scopebox, Ultrascopes or the one in your broadcast monitor.
Using Proxies
If you used DPX to conform you sequence, you might want to use proxies to lower the demand on your disks and processors. By default, Resolve sets the default proxy size to 1/4 of the resolution of your project. It the case of a 1080p project, Resolve would create 960×540 DPX sequences for each original clip. You can change that resolution at the bottom of the Image Scaling panel of the Project Settings window.
To activate the proxies you can either clic the “Use real time proxies” box on the same page or press COMMAND+P for “Proxy on the fly”.
Cache
If, despite all this optimization, you are still having problem getting realtime render while playing back your media you can use the Cache. This is a good old render to disk. This will bake your grade in a DPX sequence that will be used for playback instead of trying to render the grades over the original media in realtime. This won’t limit you at all if you have to make changes to the shots because the cache files are rendered again after change you make. You just got to make sure that you cache folder is on a disk that can playback realtime DPX.
You can choose to cache transitions, all the clips or only selected clips. These options are in the top Playback menu under Render cache. To manually add a clip to the cache you can right-clic on it and choose “Mark clip for render cache”. You see two circling arrows and a percentage showing the caching process appearing on the thumbnail.
This is very useful for critical approbation sessions. You don’t want you system to stutter while sitting in a room with studio executives.
Conclusion
Resolve is a very scalable software. It can run on a Macbook Pro or a multi-station linux cluster. But, in every case, you have all the tools to make sure you squeeze all the power you can from you setup. Resolve 10 is even better at this than it’s ever been. You can now bring it on set, grade in a truck and finish in the thousand-bucks-a-day suite without skipping a frame. Now, you don’t have any reason not to load it and grade like never before.
All these solutions can be found in the DaVinci Resolve 10 manual so next time you have a playback problem… RTFM!
_________
By Mathieu Marano, colorist @ ilovehue
Pour la version française suivez ce lien